Outlook is a popular and well-recognized email solution platform used by millions of people every day; however, it assumes that everyone who uses it can organize office correspondence daily for optimal productivity. But, what if they do not?
In this article, we will teach you how to manage your Outlook email effectively as well as hacks, tips, and tricks on how to increase productivity and improve efficiency for the whole team!
One of the first useful rules of improving productivity especially in the Outlook platform is to automate as many tasks as possible. Here are some insightful tips you can share with your team on how to stay organized, be more efficient and productive:
- USE “FLAGS” AND CATEGORIES TO TRACK IMPORTANT EMAILS IN YOUR INBOX
To do this, you need to hover over the email you want to highlight and in the right-hand corner of that email, a flag option will come up. Press the flag, and when it turns red, it means you have flagged.
Why do this? For starters, you can manage your email more efficiently especially when our inbox gets filled up. It can be easy to forget important emails, but, when you flag it – you are able to search them right away.
One of the best ways to keep your email organized is by utilizing the flagging feature. You can do so like this:
- Where it says Date, click that and a drop-down of many options will come up. Choose Flagged and all emails that have ever been flagged will come up in chronological order.
- This way your emails will not get lost and you can find them quicker. Once you are done with the email, just unflag it by clicking the same button.
- USE SHORTCUTS
In retrospect, clicking the button on Outlook for a new email does not take long, however, knowing some keyboard shortcuts is important when it comes to efficiency. Here are some of the best Outlook shortcuts for you and your team (if you are not aware of them yet):
- Reply to an email: Ctrl + R
- To create a new email: Ctrl + Shift + M
- To open your email: Ctrl + 1
- To open your calendar: Ctrl + 2
- To open your contacts: Ctrl + 3
- To open your tasks: Ctrl + 4
- To send an email: Ctrl + Enter
- SCHEDULE YOUR EMAILS
Did you know that outlook has a feature that allows you or your team to schedule out email delivery for future times and dates? For instance, if you are taking time off, or have an appointment, but you need to send an email out that day, no problem! We got you covered and if you want to learn how to schedule an email in outlook, here is how to do it:
- Type out your email
- Click on the Options tab
- Select Delay Delivery
This will open a dialogue box with a do not deliver before option that you can change. Your message will be held until the specified time and then delivered to the recipient.
Just a quick note, your Outlook does not have to be open for the scheduled emails to send. A delayed email can still send even if Outlook is closed.
- ACCESS TO ORGANIZATIONAL CALENDAR
With most companies being forced to adapt to working from home, most organizations need to have remote meetings. Setting up a meeting with multiple people can be tricky, however, in Outlook there is a feature where you can view anyone’s calendar. So, when you are setting up a meeting, you can have full access to everyone's schedule and ensure there is no conflict in scheduling or overlapping. You can do so by knowing who has certain permissions at different levels. Depending on the admin, some people can do it, whereas others cannot. Get in touch with whoever set up Outlook to understand who oversees the shared calendar permission.
- CREATE A TEAMS MEETING
If you are not already using web conferencing tools, you should start right away. If you have Microsoft Teams, but do not know how to make a virtual team meeting, follow the steps below. Teams Meeting is great because it is directly integrated into your Outlook (you have access to everyone’s schedule) and it offers video and audio conference calls, screen sharing, display presentations, and so much more. If you do not how to start a team meeting, follow the steps below:
From your Outlook calendar, click New Teams Meeting located on the Home Ribbon.
If you wanted to send team meeting links to external parties/ users, you can do so well and the receiving person does
not need to have an Outlook account, they just access it on the web (there are three options there)
- SHARED EMAIL BOX
An open shared email box means multiple team members can easily access a central mailbox where a user logs into the shared mailbox and act as the owner of that mailbox. While logged in, the user can create calendar items; read, view, delete, and change email messages; create tasks and calendar contacts. In addition, a user impersonates the shared mailbox when sending mail and lets a user send an email on behalf of the shared mailbox.
NOTE You can only use this feature in Exchange 2013 and later.
Among the most common advantages of using shared mailboxes include these abilities:
- Monitor and send email from a centralized account.
- Handle customer email inquiries: numerous users within the organization can share the responsibility for monitoring the mailbox and answering queries.
- Share Outlook calendar information: multiple users can plan, and view work shifts and/or holiday time.
- AUTOMATE YOUR INBOX WITH MAILBOX RULES
A rule is an action that Outlook for Windows runs automatically on incoming or outgoing emails. You choose what triggers the rule as well as the actions the rule takes. For example, you can create a rule to move all messages from your manager to a folder or to delete all messages with “Buy now!” in the subject.
By using the feature of rules, you and your team can reduce manual and repetitive actions needed to manage your email messages. When you turn on rules, they run continuously and automatically.
Rules generally fall into one of two categories — organization or notification. You can use the Rules Wizard to help you design rules to manage your messages. Some things you can do are send automated emails, send incoming emails into specific folders automatically or create a rule in Outlook to move certain emails to the desired folder.
If you want to learn how to create a rule in your mailbox, do the following steps:
- Choose Rules > Manage Rules & Alerts from the ribbon or choose the File tab and then choose Manage Rules & Alerts.
- In the Rules and Alerts dialogue box, on the E-mail Rules tab, choose New Rule.
- In the Rules Wizard, under Step 1: Select a template, pick one of the default templates under Stay Organized, Stay Up to Date, or Start from a blank rule.
- CREATE EMAIL TEMPLATES
Does your team always have to retype the same email? If so, Outlook as an email feature where you can create and use email templates/shortcut to send messages that include information that infrequently changes from message to message. Compose and save a message as a template, and then reuse it when you want it. New information can be added before the template is sent as an email message.
Follow the below steps if you want to create templates:
- Create a new email and fill in the subject and body to prepare the template.
- In the message window, click the File button in the top left corner.
- Click Save As.
- In the Save As dialogue box, in the Save as type list, click Outlook Template.
- In the File name box, type a name for your template, and then click Save.
- CREATE A SEGMENTED GROUP(S) IN YOUR CONTACTS.
Setting up different contact groups/ distribution list in your Outlook allows you to be organized. You can choose a set of people you wish to collaborate with and easily set up a collection of resources for those people to share. Moreover, you can also edit the people in the distribution list. For example, if your company is big enough and you have a different department, and you want to send an email to the Bookkeeping department, you would of a pre-selected list of people in that department and they would be the only ones to get it.
If you do want to take advantage of this feature and want to learn how to create a distribution list in Outlook 365 follow the steps below:
- On the Navigation bar, click People.
Note: You can find People in one of two places on the Navigation bar.
If you are using the compact Navigation bar, click the People icon.

If you are using the expanded Navigation bar, click the word, People.

- Under My Contacts, select the folder where you want to save the contact group. Usually, you will select Contacts.
- On the Ribbon, select New Contact Groups.
- Give your contact group a name.
- Click Add Members, and then add people from your address book or contacts list.
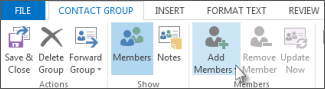
Note: To add someone who is not in your address book or contacts, select New E-mail Contact. - Click Save & Close.
- AUTOMATIC ARCHIVING OF OLD EMAILS, INSTEAD OF DELETING
Most people do not know this, but when you have Microsoft Exchange, you can auto-archive your emails. Email archiving is the process of removing emails from your inbox and putting it in an accessible location. You can manage this automatically or manually depending on your preferences, and you can search emails that have been archived by contacts, keywords, or dates.
The whole intention of archiving is to give you and your team a central location where you can store emails that are no longer needed, but at some point, may need to be referenced to. Overall, it ensures that your inbox is kept organized with only relevant day to day emails/ attachments.
Outlook as an application works great, however, if you’re a growing business and are looking to scale, consider implementing Microsoft Exchange. Interested in finding out what else you can do? Get in touch with us!